
Testing Jekyll locally on Windows
Jekyll is a static website generator that is simple to use, but also heavily customizable with loads of themes and plugins available. Since it is also supported by GitHub Pages, it became my choice for building this blog.
Jekyll also lets you test your site locally before publishing, but as a Windows user, this often ends up causing me more grief than joy. For instance: Jekyll runs on Ruby, which in turn requires you to install the MSYS2 and MINGW development toolchain to work.
You can always just run your applications in WSL (Windows Subsysten Linux). According to the WSL docs, ports bound to wildcard or localhost are also available on the host, but this has been troublesome for me in the past. In addition, issues with the (simplified) way WSL translates between Unix and Windows file permissions can cause issues.
For me, the solution is to use a Dev container to set up a Linux environment to build and run my site in.
Prerequisites:
- Visual Studio Code (VSCode) - You can also use Intellij IDEA, but I will be using VSCode in this guide
- Docker Desktop - You can use any docker compatible tool you like, but for most, Docker Desktop is the simplest to get up and running
- Dev container plugin for VSCode
Prepare your repository:
For this guide, we will start with an empty repository.
If you plan to publish this site as GitHub Pages later, you might want to start by creating a repo named your-github-username.github.io as described under Creating a repository for your site in this guide.
After you have created the repo, clone it locally, and open it in VSCode.
Add Dev container files
In the root of your empty repo, create a folder called .devcontainer, and add these two files:
Dockerfile
FROM ruby:3.4
RUN gem install jekyll

ENV BUNDLE_APP_CONFIG=.bundle
EXPOSE 4000/tcp
This gives us a container using the official Ruby image (pick a version supported by Jekyll), with the latest version of Jekyll installed.
We must also override the BUNDLE_APP_CONFIG set by the Ruby image to get bundler to store its config in the workspace folder. Ref this issue.
devcontainer.json
{
    "name": "Jekyll-testsite",
    "build": { "dockerfile": "Dockerfile" },
    "forwardPorts": [4000]
}
This is the config file for the Dev container.
In addition to stating what dockerfile to use to build the image, it forwards port 4000 on the host system to the Dev container.
Remember to save both files.
Build and run your Dev container:
Make sure that Docker Desktop (or equivalent) i s running by opening a terminal and typing:
docker –version
It should look something like this:
PS C:\> docker --version
Docker version 27.3.1, build ce12230
PS C:\>
With Docker ready, bring up the Command Palette (Ctrl+Shift+P) and search for “rebuild and reopen in container”.
Select it in the list. VSCode will now build a Docker image based on the Docker file in our devcontainer.json, run it using Docker, and relaunch VSCode:

When finished, you should be able to see the running container in Docker Desktop:
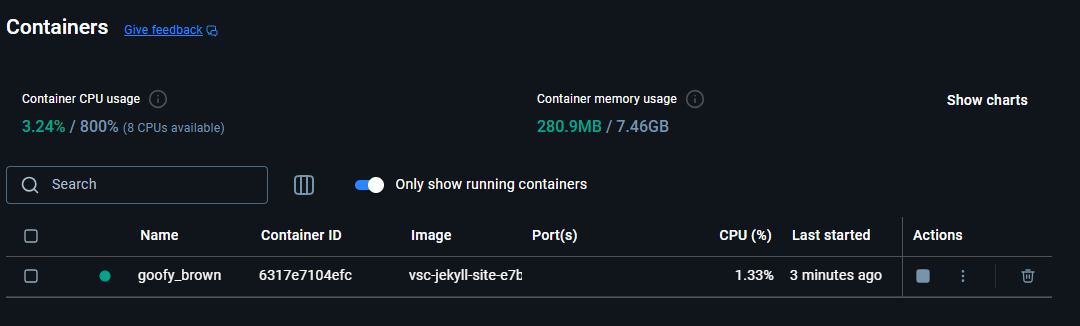
And when opening a new terminal in VSCode, It should look something like this:
root@6317e7104efc:/workspaces/bendikwa.github.io#Create a new Jekyll site:
Since we are now working inside the Dev container, we will from now on be following the guides for Linux installs.
Depending on how you want your Github Pages organized, this next step may vary, but if we continue to follow the Github guide, we want to create a site in a folder called “docs”
To do this we jump into the guide at step 5 under Creating your site:
mkdir docs
cd docs
jekyll new --skip-bundle .
Compatible gem versions for Github Pages
Native Github Pages does not support the latest version of Jekyll, so to be sure we are using supported versions, we need to edit our Gemfile.
First we need to add a ‘#’ to the line starting with gem "jekyll" to comment it out, then we need to uncomment the line starting with # gem "github-pages" do add it as a dependency.
Change the line to:
gem "github-pages", "~> GITHUB-PAGES-VERSION", group: :jekyll_pluginsand replace GITHUB-PAGES-VERSION with the newest version of the github-pages found here https://pages.github.com/versions/
After this you install the gems.
Installing the gems in a local directory made startup and restart of Jekyll very slow on my machine. If this is a problem for you, you can skip the bundle config --local path "vendor/bundle" step, but it means that you will have to install the gems again each time you rebuild the Dev container.
First we configure bundler to install all gems in a local directory: vendor/bundle
bundle config --local path "vendor/bundle"This will create a file .bundle/config containing the configuration.
Afterwards, we can install the gems with:
bundle installStoring both the config and the gems in our project directory ensures that we don’t have to recreate it if we make changes to the Dev containerimage and need to rebuild it.
Remember to add any folders containing gems or config to your .gitignore
Running Jekyll locally
With everything set up, we have now come to the main objective of this guide.
To run Jekyll inside the Dev container you can use the jekyll serve command. We prefix it with bundle exec to make sure we are using the version of Jekyll that is defined in our Gemfile (via the github-pages gem)
bundle exec jekyll serveIt should look something like this:
root@6317e7104efc:/workspaces/bendikwa.github.io/docs# bundle exec jekyll serve
Configuration file: /workspaces/bendikwa.github.io/docs/_config.yml
To use retry middleware with Faraday v2.0+, install `faraday-retry` gem
            Source: /workspaces/bendikwa.github.io/docs
       Destination: /workspaces/bendikwa.github.io/docs/_site
 Incremental build: disabled. Enable with --incremental
      Generating...
       Jekyll Feed: Generating feed for posts
                    done in 0.62 seconds.
                    Auto-regeneration may not work on some Windows versions.
                    Please see: https://github.com/Microsoft/BashOnWindows/issues/216
                    If it does not work, please upgrade Bash on Windows or run Jekyll with --no-watch.
 Auto-regeneration: enabled for '/workspaces/bendikwa.github.io/docs'
    Server address: http://127.0.0.1:4000/
  Server running... press ctrl-c to stop.
You should now be able to browse to your new site on http://localhost:4000/
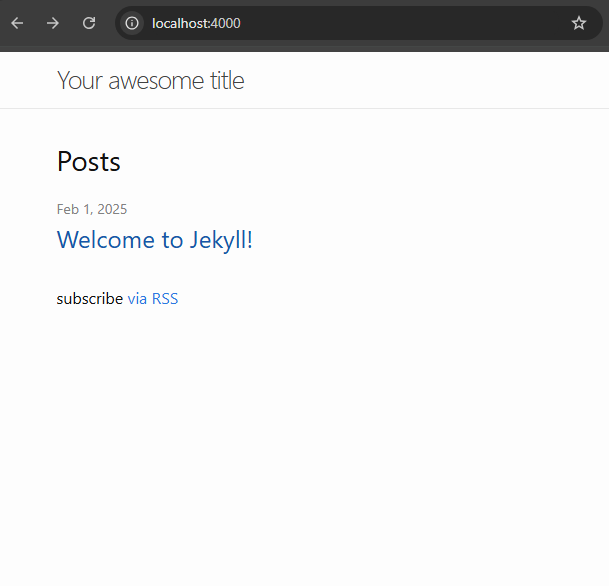
Profit!
You can now continue to follow the guide to get your new site deployed with Github Pages.
Many Jekyll themes instruct you to fork/clone their repository to get started, and you can, of course, just do that, and then drop the files in .devcontainer into it to get the same result.
If you want to use a newer Jekyll version, or want to use other plugins than the ones allowlisted by Github Pages, you can now use a Github Actions based option to build and host Jekyll based pages: https://jekyllrb.com/docs/continuous-integration/github-actions/
This is just a simple example of how you can use Dev containers. It is a very powerful tool in any project where you need a specific environment to run tools or test code in.
When building and deploying the Dev container, some things happen behind the scenes that are worth knowing about. One of them is that your local (Windows) .gitconfig is copied into the Dev container. If you, like me, have some Windows specific configuration in it (I use the 1 Password SSH Agent to sign my commits in GIT using my SSH key), things might not work as you want it to. You might also have other dotfiles you want to have loaded into the environment like aliases etc. One way of solving this is to create a separate repository containing your dotfiles and adding that to the configuration of the Dev container plugin. More on that here: Using a dotfile repo with Dev containers
Leave a comment
Your email address will not be published. Required fields are marked *